| 일 | 월 | 화 | 수 | 목 | 금 | 토 |
|---|---|---|---|---|---|---|
| 1 | 2 | 3 | 4 | 5 | 6 | 7 |
| 8 | 9 | 10 | 11 | 12 | 13 | 14 |
| 15 | 16 | 17 | 18 | 19 | 20 | 21 |
| 22 | 23 | 24 | 25 | 26 | 27 | 28 |
- Selenium
- 한빛아카데미
- 가비아
- aws
- 컴파일설치
- MySQL
- 수동설치
- Apache
- deeplearning
- 생활코딩
- 딥러닝
- image
- attention
- Crawling
- 비지도학습
- 프로그램새내기를위한자바언어프로그래밍
- 한빛미디어
- 소스설치
- 밑바닥부터시작하는딥러닝2
- AndroidStudio를활용한안드로이드프로그래밍
- 크롤링
- 머신러닝
- CBOW
- 논문리뷰
- 예제중심HTML&자바스크립트&CSS
- word2vec
- 셀레니움
- 밑바닥부터시작하는딥러닝
- jupyter
- Lamp
- Today
- Total
안녕, 세상!
11. 어댑터뷰 본문
(1)리스트뷰&그리드뷰
① 어댑터뷰(AdapterView)
ViewGroup의 하위 클래스 중에서 레이아웃을 제외한 것을 뷰 컨테이너라고 합니다.
AdapterView는 뷰 컨테이너로 하위에 ListView, ExpandableListView, GridView, Spinner, Gallery 등이 있습니다.
java.lang.Object
ㄴ android.view.View
ㄴ android.widget.ViewGroup
ㄴ android.widget.AbsListView
ㄴ android.widget.GridView
ㄴ android.widget.ListView
ㄴ android.widget.ExpandableListView
ㄴ android.widget.AbsSpinner
ㄴ android.widget.Spinner
ㄴ android..widget.Gallery
어댑터뷰는 그 자체를 사용하기보다는 하위의 클래스를 사용합니다.
② 리스트뷰
리스트뷰(ListView)는 데이터를 리스트 모양으로 보여주며 리스트 중 하나를 선택하는 용도로 사용합니다.
안드로이드의 [설정]을 실행하면 리스트뷰가 나와 각 항목을 선택할 수 있는 것이 한 예시입니다.
activity_main.xml
|
1
2
3
4
5
6
7
8
9
10
11
12
|
<?xml version="1.0" encoding="utf-8"?>
<LinearLayout xmlns:android="http://schemas.android.com/apk/res/android"
xmlns:tools="http://schemas.android.com/tools"
android:layout_width="match_parent"
android:layout_height="match_parent"
android:orientation="vertical">
<ListView
android:layout_width="match_parent"
android:layout_height="wrap_content"
android:id="@+id/listview1" />
</LinearLayout>
|
cs |
MainActivity.java
|
1
2
3
4
5
6
7
8
9
10
11
12
13
14
15
16
17
18
19
20
21
22
23
24
25
26
27
28
29
30
|
import android.os.Bundle;
import android.view.View;
import android.widget.AdapterView;
import android.widget.ArrayAdapter;
import android.widget.ListView;
import android.widget.Toast;
import androidx.appcompat.app.AppCompatActivity;
public class MainActivity extends AppCompatActivity {
@Override
protected void onCreate(Bundle savedInstanceState) {
super.onCreate(savedInstanceState);
setContentView(R.layout.activity_main);
setTitle("리스트뷰 테스트");
final String[] fruits = {"사과","배","수박","멜론","딸기","복숭아","참외","키위","파인애플"};
ListView list = (ListView) findViewById(R.id.listview1);
ArrayAdapter<String> adapter = new ArrayAdapter<String>(this, android.R.layout.simple_list_item_1, fruits);
// adapter형의 변수를 선언. 두번째 파라미터는 리스트뷰의 형식을 설정, 세번째 파라미터는 적용할 배열 설정
list.setAdapter(adapter); // 생성한 어레이어댑터를 list변수에 적용함
list.setOnItemClickListener(new AdapterView.OnItemClickListener(){ //리스트뷰 항목 리스너
public void onItemClick(AdapterView<?> arg0, View arg1, int arg2, long arg3) { // 리스너 항목 클릭 시
Toast.makeText(getApplicationContext(), fruits[arg2],Toast.LENGTH_SHORT).show(); // 항목 이름 토스트시키기
}
});
}
}
|
cs |

사과 항목을 선택하면 토스트에 해당 항목의 이름이 뜹니다.
리스트뷰의 다양한 모양 설정
위의 예제에서 20번째 줄의 android.R.layout.simple_list_item_1을 사용해서 리스트뷰 모양을 지정했습니다.
이 두 번째 파라미터를 다른 것으로 변경해서 모양을 바꿀 수 있습니다.
simple_list_item_single_choice : 라디오 버튼 모드
simple_list_item_multiple_choice : 체크박스 모드
위의 예제의 20~22번째 줄을 다음과 같이 바꿔보겠습니다.
|
1
2
3
|
ArrayAdapter<String> adapter = new ArrayAdapter<String>(this, android.R.layout.simple_list_item_multiple_choice, fruits);
list.setChoiceMode(ListView.CHOICE_MODE_MULTIPLE); // 다중 선택이 가능하도록 설정, 라디오버튼은 CHOICE_MODE_SINGLE을 사용함
list.setAdapter(adapter);
|
cs |

리스트뷰의 동적 추가 및 삭제
리스트뷰의 항목들을 동적으로 추가하거나 삭제할 수 도 있습니다.
이를 구현하려면 ArrayList<T>를 정의한 후 add()와 remove() 메소드를 사용해야 합니다.
activity_main.xml
|
1
2
3
4
5
6
7
8
9
10
11
12
13
14
15
16
17
18
19
20
|
<?xml version="1.0" encoding="utf-8"?>
<LinearLayout xmlns:android="http://schemas.android.com/apk/res/android"
xmlns:tools="http://schemas.android.com/tools"
android:layout_width="match_parent"
android:layout_height="match_parent"
android:orientation="vertical">
<EditText
android:layout_width="match_parent"
android:layout_height="wrap_content"
android:id="@+id/edtitem" />
<Button
android:layout_width="match_parent"
android:layout_height="wrap_content"
android:id="@+id/btnadd"
android:text="항목 추가"/>
<ListView
android:layout_width="match_parent"
android:layout_height="wrap_content"
android:id="@+id/listview1" />
</LinearLayout>
|
cs |
MainActivity.java
|
1
2
3
4
5
6
7
8
9
10
11
12
13
14
15
16
17
18
19
20
21
22
23
24
25
26
27
28
29
30
31
32
33
34
35
36
37
38
39
40
41
42
|
import android.os.Bundle;
import android.view.View;
import android.widget.AdapterView;
import android.widget.ArrayAdapter;
import android.widget.Button;
import android.widget.EditText;
import android.widget.ListView;
import androidx.appcompat.app.AppCompatActivity;
import java.util.ArrayList;
public class MainActivity extends AppCompatActivity {
@Override
protected void onCreate(Bundle savedInstanceState) {
super.onCreate(savedInstanceState);
setContentView(R.layout.activity_main);
final ArrayList<String> fruitslist = new ArrayList<String>();
ListView list = (ListView) findViewById(R.id.listview1);
final ArrayAdapter<String> adapter = new ArrayAdapter<String>(this, android.R.layout.simple_list_item_1,fruitslist);
list.setAdapter(adapter);
final EditText edtitem = (EditText) findViewById(R.id.edtitem);
Button btnadd = (Button) findViewById(R.id.btnadd);
btnadd.setOnClickListener(new View.OnClickListener(){
public void onClick(View v){
fruitslist.add(edtitem.getText().toString()); //에디트 텍스트의 내용을 가져옴
adapter.notifyDataSetChanged(); // 추가할 항목이 보이게 함. 즉 추가시켜줌
}
});
list.setOnItemLongClickListener(new AdapterView.OnItemLongClickListener(){ // 항목 롱클릭 리스너
public boolean onItemLongClick(AdapterView<?> parent, View view, int position, long id){//롱클릭 하면
fruitslist.remove(position); //해당 포지션의 항목 삭제
adapter.notifyDataSetChanged(); //화면에 적용
return false; // 일단 여기서 true로 해도 상관은 없음
}
});
}
}
|
cs |
38번째 줄의 return 값
안드로이드의 리스너의 return 값의 의미
true : 이벤트가 다뤄졌고 해당 항목에 대해서 다른 이벤트가 발생하지 않을 것이다.
false : 이벤트가 아직 다 다뤄지지 않았고 해당 항목에 대해서 다른 이벤트가 발생할 수 있을 것이다.
위의 list변수에 대해서 setOnItemLongClickListener()이 먼저 오고 그다음 연속으로 setOnItemClickListener()이 위치해 있다고 가정했을 때 list 항목을 길게 눌렀을 경우 setOnItemLongClickListener()도 반응하고 setOnItemClickListener()도 반응을 할 것입니다.
이때 setOnItemLongClickListener()에 return false; 를 하면 아직 다른 이벤트를 발생할 수 있다는 의미로 setOnItemClickListener()에 설정된 코드가 실행될 것입니다.
하지만 ruturn true; 를 하면 list 변수에 대한 이벤트는 끝난 것이므로 setOnItemClickListener()의 코드는 동작하지 않을 것입니다.
이러한 의미에서 위의 코드에서는 true를 쓰단 false를 쓰던 동작에 상관없습니다.
결과는 다음과 같이 항목을 생성할 수 있고 항목을 길게 누르면 항목이 삭제됩니다.

③ 그리드뷰
그리드뷰는 사진이나 그림을 격자 모양으로 배치해줍니다.
다른 위젯을 배치할 수 있지만 주로 사진이나 그림을 배치합니다.
다음은 그리드뷰를 이용한 예제로 Project tree의 /res/drawable에 미리 사진을 넣어놔야 합니다.
activity_main.xml
|
1
2
3
4
5
6
7
8
9
10
11
12
13
|
<?xml version="1.0" encoding="utf-8"?>
<LinearLayout xmlns:android="http://schemas.android.com/apk/res/android"
xmlns:tools="http://schemas.android.com/tools"
android:layout_width="match_parent"
android:layout_height="match_parent"
android:orientation="vertical">
<GridView
android:layout_width="match_parent"
android:layout_height="wrap_content"
android:id="@+id/gridview1"
android:gravity="center"
android:numColumns="3" />
</LinearLayout>
|
cs |
13 : android:numColumns는 열의 개수 설정
dialog.xml
|
1
2
3
4
5
6
7
8
9
10
11
|
<?xml version="1.0" encoding="utf-8"?>
<LinearLayout xmlns:android="http://schemas.android.com/apk/res/android"
android:orientation="vertical"
android:layout_width="match_parent"
android:layout_height="match_parent"
android:gravity="center">
<ImageView
android:layout_width="wrap_content"
android:layout_height="wrap_content"
android:id="@+id/dialogim" />
</LinearLayout>
|
cs |
MainActivity.java
|
1
2
3
4
5
6
7
8
9
10
11
12
13
14
15
16
17
18
19
20
21
22
23
24
25
26
27
28
29
30
31
32
33
34
35
36
37
38
39
40
41
42
43
44
45
46
47
48
49
50
51
52
53
54
55
56
57
58
59
60
61
62
63
64
65
66
67
68
69
70
71
72
|
import android.content.Context;
import android.os.Bundle;
import android.view.View;
import android.view.ViewGroup;
import android.widget.BaseAdapter;
import android.widget.GridView;
import android.widget.ImageView;
import androidx.appcompat.app.AlertDialog;
import androidx.appcompat.app.AppCompatActivity;
public class MainActivity extends AppCompatActivity {
@Override
protected void onCreate(Bundle savedInstanceState) {
super.onCreate(savedInstanceState);
setContentView(R.layout.activity_main);
setTitle("그리드뷰 사진");
final GridView gv = (GridView) findViewById(R.id.gridview1);
MyGridAdapter gadt = new MyGridAdapter(this);
gv.setAdapter(gadt);
}
Integer[] posterid = {R.drawable.harleyquinn, R.drawable.iamironman,R.drawable.iloveyou3000,R.drawable.tonyinspaceship};
public class MyGridAdapter extends BaseAdapter {
Context context;
public MyGridAdapter(Context c){
context = c;
}
@Override
public int getCount() {
return posterid.length;
}
@Override
public Object getItem(int i) {
return null;
}
@Override
public long getItemId(int i) {
return 0;
}
@Override
public View getView(int position, View convertview, ViewGroup parent) {
ImageView imv = new ImageView(context);
imv.setLayoutParams(new GridView.LayoutParams(200, 300)); // 이미지뷰 크기를 200 x 300 크기로 지정
imv.setScaleType(ImageView.ScaleType.FIT_CENTER); // 이미지뷰를 각 그리드뷰 칸의 중앙에 배치함
imv.setPadding(5,5,5,5); // 그림사이 간격 설정
imv.setImageResource(posterid[position]); // 이미지뷰에 그림 1개 적용
final int pos = position;
imv.setOnClickListener(new View.OnClickListener(){
public void onClick(View v){
View dialogView = (View) View.inflate(MainActivity.this, R.layout.dialog, null);
AlertDialog.Builder dlg = new AlertDialog.Builder(MainActivity.this);
ImageView dialogim = (ImageView) dialogView.findViewById(R.id.dialogim);
dialogim.setImageResource(posterid[pos]);
dlg.setTitle("그림");
dlg.setIcon(R.drawable.ic_launcher_foreground);
dlg.setView(dialogView);
dlg.setNegativeButton("닫기",null);
dlg.show();
}
});
return imv;
}
}
}
|
cs |
MyGridAdapter은 사용자가 따로 만든 그리드어댑터로 BaseAdapter을 상속받았습니다.
24 : 사진의 id를 묶은 리스트
30번째 줄 까지 작성한 후 커서를 32번째 줄에 놓고 [ctrl+i]를 누르면 MyGridAdapter안에 BaseAdapter의 추상 메소드를 자동 완성시켜줍니다.
33 : getCount() 메소드는 그리드뷰에 보일 이미지 개수를 반환하도록 수정함
48 : getView()는 그림들을 각 그리드뷰의 칸마다 이미지뷰로 보여주게 하는 역할을 함
49~53 : 그리드뷰의 칸마다 이미지뷰로 보여줄 때 구체적인 설정
55~66 : 그림을 클릭했을 때 대화 상자가 나오고 해당 그림의 원본이 나오게 설정


(2) 갤러리와 스피너
① 갤러리(Gallery)
갤러리는 사진이나 이미지를 배치하고 좌우로 스크롤해서 볼 수 있게 합니다.
앞에서 본 그리드뷰와 효과는 비슷하지만 좀 더 부드럽고 고급스러운 느낌을 줄 수 있습니다.
다음 예제는 갤러리를 이용하 예제이며 그리드뷰의 코드의 형식과 거의 비슷합니다.
acitivity_main.xml
|
1
2
3
4
5
6
7
8
9
10
11
12
13
14
15
16
17
18
|
<?xml version="1.0" encoding="utf-8"?>
<LinearLayout xmlns:android="http://schemas.android.com/apk/res/android"
xmlns:tools="http://schemas.android.com/tools"
android:layout_width="match_parent"
android:layout_height="match_parent"
android:orientation="vertical">
<Gallery
android:layout_width="match_parent"
android:layout_height="wrap_content"
android:id="@+id/gallery1"
android:spacing="5dp" />
<ImageView
android:layout_width="match_parent"
android:layout_height="wrap_content"
android:id="@+id/bigim"
android:padding="20dp" />
</LinearLayout>
}
|
cs |
MainActivity.java
|
1
2
3
4
5
6
7
8
9
10
11
12
13
14
15
16
17
18
19
20
21
22
23
24
25
26
27
28
29
30
31
32
33
34
35
36
37
38
39
40
41
42
43
44
45
46
47
48
49
50
51
52
53
54
55
56
57
58
59
60
61
62
63
64
65
66
67
|
import android.content.Context;
import android.os.Bundle;
import android.view.MotionEvent;
import android.view.View;
import android.view.ViewGroup;
import android.widget.BaseAdapter;
import android.widget.Gallery;
import android.widget.ImageView;
import androidx.appcompat.app.AppCompatActivity;
public class MainActivity extends AppCompatActivity {
@Override
protected void onCreate(Bundle savedInstanceState) {
super.onCreate(savedInstanceState);
setContentView(R.layout.activity_main);
setTitle("그림");
Gallery gallery = (Gallery) findViewById(R.id.gallery1);
MyGalleryAdapter galAdapter = new MyGalleryAdapter(this);
gallery.setAdapter(galAdapter);
}
public class MyGalleryAdapter extends BaseAdapter {
Context context;
Integer[] imageid={R.drawable.harleyquinn, R.drawable.iamironman,R.drawable.iloveyou3000,R.drawable.tonyinspaceship};
public MyGalleryAdapter(Context c){
context = c;
}
@Override
public int getCount() {
return imageid.length;
}
@Override
public Object getItem(int i) {
return null;
}
@Override
public long getItemId(int i) {
return 0;
}
@Override
public View getView(int position, View convertview, ViewGroup parent) {
ImageView imageview = new ImageView(context);
imageview.setLayoutParams(new Gallery.LayoutParams(300,200));
imageview.setScaleType(ImageView.ScaleType.FIT_CENTER); // 이미지뷰를 각 그리드뷰 칸의 중앙에 배치함
imageview.setPadding(5,5,5,5); // 그림사이 간격 설정
imageview.setImageResource(imageid[position]); // 이미지뷰에 그림 1개 적용
final int pos = position;
imageview.setOnTouchListener(new View.OnTouchListener(){
public boolean onTouch(View v, MotionEvent event){
ImageView Bigim = (ImageView) findViewById(R.id.bigim);
Bigim.setScaleType(ImageView.ScaleType.FIT_CENTER); //이미지뷰를 중앙 설정
Bigim.setImageResource(imageid[pos]);
return false;
}
});
return imageview;
}
}
}
|
cs |
55 : click이 아니라 touch리스너를 사용했습니다.

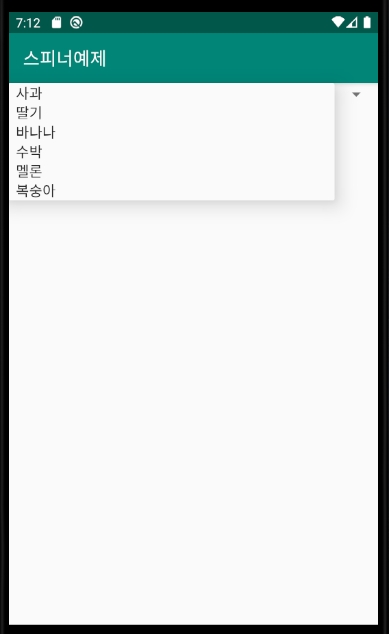
② 스피너(Spinner)
스피너는 pc의 드롭다운 박스와 비슷한 기능을 합니다.
화면이 작은 스마트폰에서 여러 개 중 하나를 선택할 수 있도록 확장하는 요도로 쓰입니다.
다음은 스피너 예제입니다.
activity_main.xml
|
1
2
3
4
5
6
7
8
9
10
11
12
|
<?xml version="1.0" encoding="utf-8"?>
<LinearLayout xmlns:android="http://schemas.android.com/apk/res/android"
xmlns:tools="http://schemas.android.com/tools"
android:layout_width="match_parent"
android:layout_height="match_parent"
android:orientation="vertical">
<Spinner
android:layout_width="match_parent"
android:layout_height="wrap_content"
android:id="@+id/spinner1" />
</LinearLayout>
|
cs |
MainActivity.java
|
1
2
3
4
5
6
7
8
9
10
11
12
13
14
15
16
17
18
19
20
21
|
import android.os.Bundle;
import android.widget.ArrayAdapter;
import android.widget.Spinner;
import androidx.appcompat.app.AppCompatActivity;
public class MainActivity extends AppCompatActivity {
@Override
protected void onCreate(Bundle savedInstanceState) {
super.onCreate(savedInstanceState);
setContentView(R.layout.activity_main);
setTitle("스피너예제");
final String[] fruits = {"사과", "딸기", "바나나", "수박", "멜론" ,"복숭아"};
Spinner spinner = (Spinner) findViewById(R.id.spinner1);
ArrayAdapter<String> adapter;
adapter = new ArrayAdapter<String>(this, android.R.layout.simple_spinner_item,fruits);
spinner.setAdapter(adapter);
}
}
|
cs |

'It공부 > 안드로이드' 카테고리의 다른 글
| 13. 멀티미디어 (0) | 2020.08.30 |
|---|---|
| 12. 데이터 관리 (0) | 2020.08.29 |
| 10. 액티비티와 인텐트 (0) | 2020.08.26 |
| 9. 그래픽 (0) | 2020.08.25 |
| 8. 파일 처리 (0) | 2020.08.24 |


