
| 일 | 월 | 화 | 수 | 목 | 금 | 토 |
|---|---|---|---|---|---|---|
| 1 | 2 | 3 | 4 | |||
| 5 | 6 | 7 | 8 | 9 | 10 | 11 |
| 12 | 13 | 14 | 15 | 16 | 17 | 18 |
| 19 | 20 | 21 | 22 | 23 | 24 | 25 |
| 26 | 27 | 28 | 29 | 30 | 31 |
- 한빛미디어
- 한빛아카데미
- aws
- 비지도학습
- 생활코딩
- 가비아
- word2vec
- image
- 셀레니움
- Apache
- 소스설치
- 크롤링
- Crawling
- Lamp
- jupyter
- 논문리뷰
- Selenium
- AndroidStudio를활용한안드로이드프로그래밍
- attention
- 프로그램새내기를위한자바언어프로그래밍
- MySQL
- 수동설치
- 딥러닝
- 머신러닝
- deeplearning
- 예제중심HTML&자바스크립트&CSS
- CBOW
- 밑바닥부터시작하는딥러닝
- 밑바닥부터시작하는딥러닝2
- 컴파일설치
- Today
- Total
안녕, 세상!
10. 액티비티와 인텐트 본문
① 안드로이드의 4대 컴포넌트
안드로이드의 4대 컴포넌트는 액티비티, 서비스, 브로드캐스트 리시버, 콘텐트 프로바이더 입니다.
액티비티
액티비티(Activity)는 화면을 구성하는 가장 기본적인 컴포넌트입니다.
서비스
서비스는 눈에 보이는 화면(Activity)과 상관없이 백그라운드에서 동작하는 컴포넌트입니다.
브로드캐스트 리시버
안드로이드는 여러 응용 프로그램이나 장치에 메시지를 전달하기 위해 방송(BroadCasting) 메시지를 사용합니다.
안드로이드는 문자 메시지 도착, 베터리 방전, SD 카드 탈부착, 네트워크 환경 변화 등이 발생하면 전체 응용 프로그램이 들을 수 있도록 방송 신호를 보냅니다.
브로드 캐스트 리시버는 이러한 방송 메시지가 발생하면 반응합니다.
콘텐트 프로바이더
콘텐트 프로바이더(Content provider)는 응용 프로그램 사이에 데이터를 공유하기 위한 컴포넌트입니다.
안드로이드 응용 프로그램은 데이터에 자신만 접근할 수 있으므로 자신의 데이터를 외부에 공개하려면 콘텐트 프로바이더를 만들어야 합니다.
콘텐트 프로바이더의 정보를 제공하는 방법으로는 URI가 있습니다.
② 액티비티 개요
액티비티는 안드로이드폰에 나타나는 화면 하나하나를 말합니다.
액티를 여러 개 사용해서 앱을 더 풍부하게 할 수 있습니다.
액티비티 추가
앞에서 안드로이드 프로젝트를 생성할 때 activity_main.xml과 MainActivity.java로 파일 주로 사용했습니다.
activity_main.xml은 화면을 구성하는 코드로 되어 있지만 MainActivity.java가 액티비티에 해당됩니다.
MainActivity.java코드는 Activity클래스를 상속받으므로 MainActivity.java를 액티비티라고 부릅니다.
액티비티 하나당 화면을 하나씩 생성할 수 있습니다.
일반적으로 액티비티 하나당 XML 파일 하나를 만들어서 사용합니다.
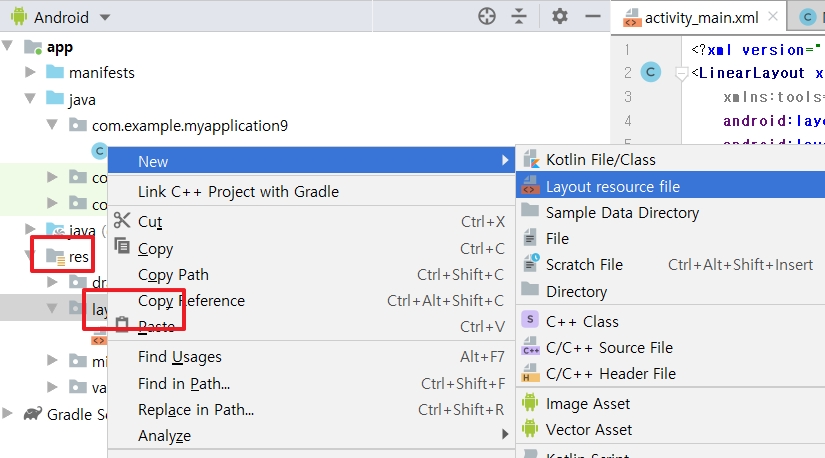
우선 Project Tree의 [res] - [layout]에서 마우스 오른쪽 클릭하고 [New] - [Layout resource file]을 선택하고 xml명을 정하고 Root element에는 'LinearLayout'을 입력하고 <OK>를 클릭합니다.
저는 second.xml이라고 만들었습니다.
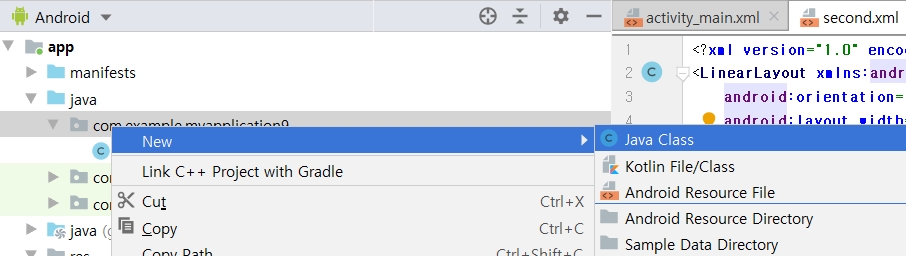
그리고 그에 맞는 액티비티인 자바도 Project Tree에서 [New] - [Java Class]를 선택해서 이름 설정하고 [OK]를 클릭합니다.
저는 SecondActivity.java라고 만들었습니다.
activity_main.xml
|
1
2
3
4
5
6
7
8
9
10
11
12
|
<?xml version="1.0" encoding="utf-8"?>
<LinearLayout xmlns:android="http://schemas.android.com/apk/res/android"
xmlns:tools="http://schemas.android.com/tools"
android:layout_width="match_parent"
android:layout_height="match_parent"
android:orientation="vertical">
<Button
android:layout_width="wrap_content"
android:layout_height="wrap_content"
android:id="@+id/btnNewActivity"
android:text="새 화면 열기" />
</LinearLayout>
|
cs |
second.xml
|
1
2
3
4
5
6
7
8
9
10
11
12
|
<?xml version="1.0" encoding="utf-8"?>
<LinearLayout xmlns:android="http://schemas.android.com/apk/res/android"
android:orientation="vertical"
android:layout_width="match_parent"
android:layout_height="match_parent"
android:background="#FF0000">
<Button
android:layout_width="wrap_content"
android:layout_height="wrap_content"
android:id="@+id/btnreturn"
android:text="돌아가기" />
</LinearLayout>
|
cs |
MainActivity.java
|
1
2
3
4
5
6
7
8
9
10
11
12
13
14
15
16
17
18
19
20
21
22
|
import androidx.appcompat.app.AppCompatActivity;
import android.content.Intent;
import android.os.Bundle;
import android.view.View;
import android.widget.Button;
public class MainActivity extends AppCompatActivity {
@Override
protected void onCreate(Bundle savedInstanceState) {
super.onCreate(savedInstanceState);
setContentView(R.layout.activity_main);
Button btnNewActivity = (Button) findViewById(R.id.btnNewActivity);
btnNewActivity.setOnClickListener(new View.OnClickListener(){
public void onClick(View v){
Intent intent = new Intent(getApplicationContext(),SecondActivity.class);
startActivity(intent); // 새로운 액티비티를 화면에 출력하려면 startActivity() 메소드 사용함
}
});
}
}
|
cs |
Intent는 좀 있다 설명할 것입니다.
17 : Intent 생성자의 첫 번째 파라미터는 메인 클래스의 컨텍스트를 반환하는데 사용되고, 두 번째 파라미터는 이 인텐트를 포함될 액티비티(SecondActivity)를 넘겨줍니다.
두번째 파라미터에 .class를 꼭 붙여야 합니다.
SecondActivity.java
|
1
2
3
4
5
6
7
8
9
10
11
12
13
14
15
16
17
18
19
20
|
import android.app.Activity;
import android.os.Bundle;
import android.view.View;
import android.widget.Button;
public class SecondActivity extends Activity {
@Override
protected void onCreate(Bundle savedInstanceState) {
super.onCreate(savedInstanceState);
setContentView(R.layout.second);
Button btnReturn = (Button) findViewById(R.id.btnreturn);
btnReturn.setOnClickListener(new View.OnClickListener(){
public void onClick(View v){
finish(); // 현재 액티비티를 종료하고 다시 전으로 돌아감
}
});
}
}
|
cs |
AndroidManifest.xml
<activity android:name=".SecondActivity"
android:label="Second Activity"/>
</application>바로 윗행에 위의 코드를 추가합니다.
추가하지 않으면 '새 화면 열기' 버튼을 누를 때 다음과 같이 오류가 나옵니다.

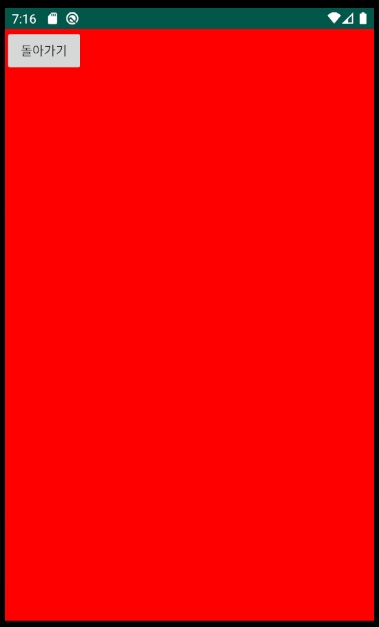
결과는 다음과 같습니다.

'새 화면 열기'버튼을 누르면 SecondActivity 화면이 나옵니다.
③ 명시적 인텐트
인텐트(intent)는 안드로이드 4대 컴포넌트가 서로 데이터를 주고받기 위한 메시지 객체입니다.
명시적 인텐트(explicit intent)는 다른 액티비티의 이름을 명확히 지정할 때 사용하는 방법입니다.
위의 예제의 MainActivity.java에서 17번째 줄처럼 이동할 액티비티 클래스명을 명확하게 지정한 것이 명시적 인텐트입니다.
일반적으로 명시적 인텐트는 사용자가 새로운 액티비티를 직접 생성하고 호출할 때 사용합니다.
위의 예제에서는 별도의 데이터를 넘기지 않고 세컨드 액티비티 화면만 보여준 후 돌아왔지만
메인 액티비티에서 인텐트에 데이터를 실어서 넘긴 다음 세컨 액티비티에서 받은 데이터를 처리할 수 있습니다.
putExtra()라는 메소드로 필요한 만큼 데이터를 인텐트에 넣은 다음 startActivity()로 인텐트를 다른 액티비티로 넘깁니다.
인텐트를 받은 액티비티에서는 getStringExtra(), getIntExtra(), getBooleanExtra() 등으로 메소드를 넘어온 데이터에 접근할 수 있습니다.
값을 보낼 Activity의 코드
Intent intent = new Intent ( 값을 보낼 Activity , 값을 받을 Activity.class);
intent.putExtra("보낼변수지칭명", 보낼 변수 );
값을 받을 Activity의 코드
Intent intent = getIntent();
int [] abc = intent.getIntArrayExtra("받은변수지칭명"); // int형 행렬 변수를 받으면 getIntArrayExtra() 를 사용함
// string형 변수를 받으면 getStringExtra()를 사용
(2) 액티비티와 인텐트의 응용
① 양방향 액티비티
메인 액티비티에서 세컨드 액티비티로 데이터를 넘긴 후 세컨드 액티비티에서 다시 메인 액티비티로 데이터를 돌려주는 경우도 있습니다.
다음은 양방향 액티비티의 과정의 순서를 설명한 것입니다.
1. 메인 액티비티에서 putExtra()로 인텐트에 보낼 데이터를 넣습니다.
2. 세컨드 액티비티에 보낸 데이터를 돌려받기 위해서 startActivityForResult()메소드를 사용해서 데이터를 보냅니다.
3. 세컨드 액티비티에서 getExtra()로 데이터를 받습니다.
4. 세컨드 액티비티에서 받은 데이터를 처리 후 보낼 데이터를 putExtra()로 인텐트에 보낼 데이터를 넣습니다.
5. setResult()메소드를 사용해서 메인 액티비티로 데이터를 보냅니다.
6. 세컨드 액티비티는 finish()로 끝냅니다.
7. 메인 액티비티에서는 onActivitiyResult() 메소드를 오버라이딩하고 오버라이딩된 메소드안에서 getExtra()로 데이터를 돌려 받습니다.
activity_main.xml
|
1
2
3
4
5
6
7
8
9
10
11
12
13
14
15
16
17
18
19
20
|
<?xml version="1.0" encoding="utf-8"?>
<LinearLayout xmlns:android="http://schemas.android.com/apk/res/android"
xmlns:tools="http://schemas.android.com/tools"
android:layout_width="match_parent"
android:layout_height="match_parent"
android:orientation="vertical">
<EditText
android:layout_width="wrap_content"
android:layout_height="wrap_content"
android:id="@+id/edtnum1" />
<EditText
android:layout_width="wrap_content"
android:layout_height="wrap_content"
android:id="@+id/edtnum2" />
<Button
android:layout_width="wrap_content"
android:layout_height="wrap_content"
android:text="더하기"
android:id = "@+id/btnplus"/>
</LinearLayout>
|
cs |
second.xml
|
1
2
3
4
5
6
7
8
9
10
11
|
<?xml version="1.0" encoding="utf-8"?>
<LinearLayout xmlns:android="http://schemas.android.com/apk/res/android"
android:orientation="vertical"
android:layout_width="match_parent"
android:layout_height="match_parent" >
<Button
android:layout_width="wrap_content"
android:layout_height="wrap_content"
android:id="@+id/btnreturn"
android:text="돌아가기" />
</LinearLayout>
|
cs |
MainActivity.java
|
1
2
3
4
5
6
7
8
9
10
11
12
13
14
15
16
17
18
19
20
21
22
23
24
25
26
27
28
29
30
31
32
33
34
35
36
37
38
|
import androidx.appcompat.app.AppCompatActivity;
import android.content.Intent;
import android.os.Bundle;
import android.view.View;
import android.widget.Button;
import android.widget.EditText;
import android.widget.Toast;
public class MainActivity extends AppCompatActivity {
@Override
protected void onCreate(Bundle savedInstanceState) {
super.onCreate(savedInstanceState);
setContentView(R.layout.activity_main);
setTitle("메인 액티비티");
Button btnplus = (Button) findViewById(R.id.btnplus);
btnplus.setOnClickListener(new View.OnClickListener(){
public void onClick(View v){
EditText edtnum1 = (EditText) findViewById(R.id.edtnum1);
EditText edtnum2 = (EditText) findViewById(R.id.edtnum2);
Intent intent = new Intent(getApplicationContext(), SecondActivity.class);
intent.putExtra("num1",Integer.parseInt(edtnum1.getText().toString()));
intent.putExtra("num2",Integer.parseInt(edtnum2.getText().toString()));
startActivityForResult(intent,0);
//값을 돌려받기 위해 사용. 두 번째 파라미터에는 돌려받을 값이 있을 경우 0이상을 사용
}
});
}
@Override
protected void onActivityResult(int requestCode, int resultCode, Intent data){
if(resultCode==RESULT_OK) {
int hap = data.getIntExtra("Hap",0); // 세컨드액티비티에서 "Hap"라는 이름으로 보낼것을 받게 설정
Toast.makeText(getApplicationContext(), "합계: "+hap, Toast.LENGTH_SHORT).show();
}
}
}
|
cs |
SecondActivity.java
|
1
2
3
4
5
6
7
8
9
10
11
12
13
14
15
16
17
18
19
20
21
22
23
24
25
26
27
28
|
import android.app.Activity;
import android.content.Intent;
import android.os.Bundle;
import android.view.View;
import android.widget.Button;
public class SecondActivity extends Activity {
@Override
protected void onCreate(Bundle savedInstanceState) {
super.onCreate(savedInstanceState);
setContentView(R.layout.second);
setTitle("Second 액티비티");
Intent inintent= getIntent();
final int hapValue = inintent.getIntExtra("num1",0)+inintent.getIntExtra("num2",0);
Button btnReturn = (Button) findViewById(R.id.btnreturn);
btnReturn.setOnClickListener(new View.OnClickListener() {
@Override
public void onClick(View view) {
Intent outintent = new Intent(getApplicationContext(),MainActivity.class);
outintent.putExtra("Hap",hapValue);
setResult(RESULT_OK,outintent);
finish();
}
});
}
}
|
cs |
16 : "num1"이라고 지칭되는 값과 "num2"라고 지칭되는 값을 받아서 둘이 덧셈한 값을 hapValue에 넣음
22 : "Hap:라고 지칭해서 hapValue값을 보내기 위해 putExtra()로 데이터를 넣음
AndroidManifest.xml
<activity android:name=".SecondActivity"
android:label="Second Activity"/>
putExtra()를 사용할 때는 그냥 putExtra를 사용하면 되는데 getExtra()를 사용할 때는 'get'과 'Extra'사이에 받을 데이터의 자료형을 써서 사용합니다. (ex getIntExtra )

더하기 버튼을 누르면 다음과 같은 액티비티가 나오고
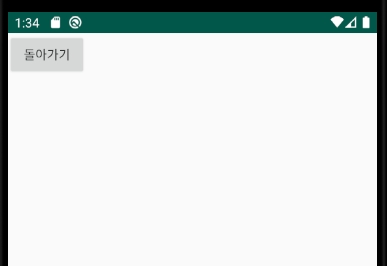
돌아가기 버튼을 누르면 원래 액티비티로 돌아가면서 토스트로 결과값이 나옵니다.

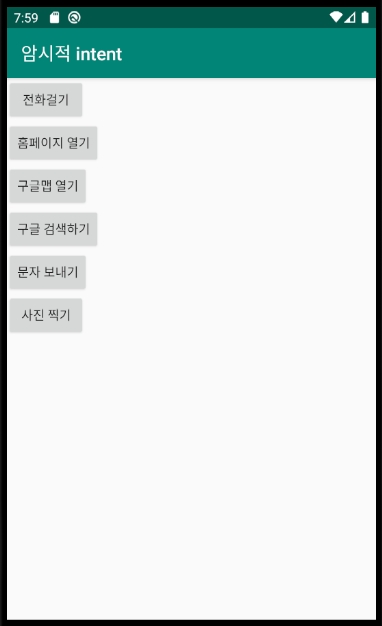
② 암시적 인텐트(Implic intent)
명시적 인텐트가 두 액티비티를 사용자가 직접 생성하고 코딩하는 것이라면, 암시적인 인텐트는 약속된 액션을 지정하여 안드로이드에서 제공하는 기존 응용 프로그램을 실행하는 것입니다.
메인 액티비티에서 인텐트를 생성할 때 실행하고자 하는 액션을 지정하고 액션의 데이터 값을 설정하면(uri.parse에 설정) 기존 안드로이드가 가지고 있는 응용 프로그램이 실행됩니다.
다음은 전화번호 데이터 값을 설정해서 전화 걸기 응용 프로그램이 실행되는 예제 형식입니다.
Intent intent = new Intent(Intent.ACTION_DIAL, uri.parse("tel:/010-1234-5678"));
startActivity(intent); // 해당 인텐트 실행
전화 걸기 및 구글 맵을 사용 하려면 AndroidManifest.xml의 <application 위에 다음과 같이 권한을 추가해야 합니다.
<uses-permission android:name="android.permission.CALL_PHONE" />
<uses-permission android:name="android.permission.ACCESS_COARSE_LOCATION" />
<uses-permission android:name="android.permission.ACCESS_FINE_LOCATION" />
activity_main.xml
|
1
2
3
4
5
6
7
8
9
10
11
12
13
14
15
16
17
18
19
20
21
22
23
24
25
26
27
28
29
30
31
32
33
34
35
36
37
|
<?xml version="1.0" encoding="utf-8"?>
<LinearLayout xmlns:android="http://schemas.android.com/apk/res/android"
xmlns:tools="http://schemas.android.com/tools"
android:layout_width="match_parent"
android:layout_height="match_parent"
android:orientation="vertical">
<Button
android:layout_width="wrap_content"
android:layout_height="wrap_content"
android:id="@+id/btnDial"
android:text="전화걸기" />
<Button
android:layout_width="wrap_content"
android:layout_height="wrap_content"
android:id="@+id/btnWeb"
android:text="홈페이지 열기" />
<Button
android:layout_width="wrap_content"
android:layout_height="wrap_content"
android:id="@+id/btnGoogle"
android:text="구글맵 열기" />
<Button
android:layout_width="wrap_content"
android:layout_height="wrap_content"
android:id="@+id/btnSearch"
android:text="구글 검색하기" />
<Button
android:layout_width="wrap_content"
android:layout_height="wrap_content"
android:id="@+id/btnMes"
android:text="문자 보내기" />
<Button
android:layout_width="wrap_content"
android:layout_height="wrap_content"
android:id="@+id/btnPhoto"
android:text="사진 찍기" />
</LinearLayout>
|
cs |
MainActivity.java
|
1
2
3
4
5
6
7
8
9
10
11
12
13
14
15
16
17
18
19
20
21
22
23
24
25
26
27
28
29
30
31
32
33
34
35
36
37
38
39
40
41
42
43
44
45
46
47
48
49
50
51
52
53
54
55
56
57
58
59
60
61
62
63
64
65
66
67
68
69
70
71
72
73
|
import android.app.SearchManager;
import android.content.Intent;
import android.net.Uri;
import android.os.Bundle;
import android.provider.MediaStore;
import android.view.View;
import android.widget.Button;
import androidx.appcompat.app.AppCompatActivity;
public class MainActivity extends AppCompatActivity {
@Override
protected void onCreate(Bundle savedInstanceState) {
super.onCreate(savedInstanceState);
setContentView(R.layout.activity_main);
setTitle("암시적 intent");
Button btnDial = (Button) findViewById(R.id.btnDial);
Button btnWeb = (Button) findViewById(R.id.btnWeb);
Button btnGoogle = (Button) findViewById(R.id.btnGoogle);
Button btnSearch = (Button) findViewById(R.id.btnSearch);
Button btnMes = (Button) findViewById(R.id.btnMes);
Button btnPhoto = (Button) findViewById(R.id.btnPhoto);
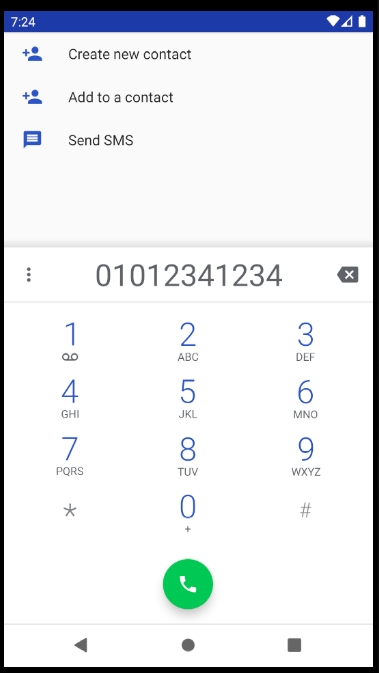
btnDial.setOnClickListener(new View.OnClickListener(){
public void onClick(View v){
Uri uri = Uri.parse("tel:01012341234");
Intent intent = new Intent(Intent.ACTION_DIAL, uri); //01012341234로 전화 다이얼을 설정해서 보여주도록 설정
startActivity(intent);
}
});
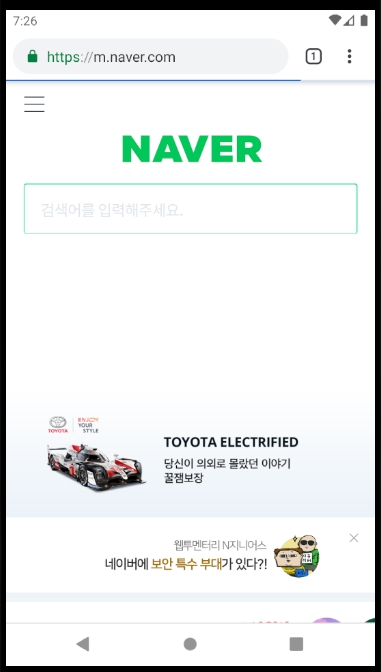
btnWeb.setOnClickListener(new View.OnClickListener(){
public void onClick(View v){
Uri uri = Uri.parse("http://www.naver.com");
Intent intent = new Intent(Intent.ACTION_VIEW,uri); // 네이버 페이지를 보여주도록 설정
startActivity(intent);
}
});
btnGoogle.setOnClickListener(new View.OnClickListener(){
public void onClick(View v){
Uri uri = Uri.parse("http://maps.google.com");
Intent intent = new Intent(Intent.ACTION_VIEW, uri); //구글 맵 앱을 틀어주도록 설정
startActivity(intent);
}
});
btnSearch.setOnClickListener(new View.OnClickListener(){
public void onClick(View v){
Intent intent = new Intent(Intent.ACTION_WEB_SEARCH);
intent.putExtra(SearchManager.QUERY, "코로나"); //코로나라고 구글로 검색한 화면을 보여주도록 설정
startActivity(intent);
}
});
btnMes.setOnClickListener(new View.OnClickListener(){
public void onClick(View v){
Intent intent = new Intent(Intent.ACTION_SENDTO);
intent.putExtra("sms_body","안녕 세상!"); // 안녕 세상! 이라고 보낼려고 설정
intent.setData(Uri.parse("smsto"+Uri.encode("010-1234-1234"))); // 보낼 사람의 번호 설정
startActivity(intent);
}
});
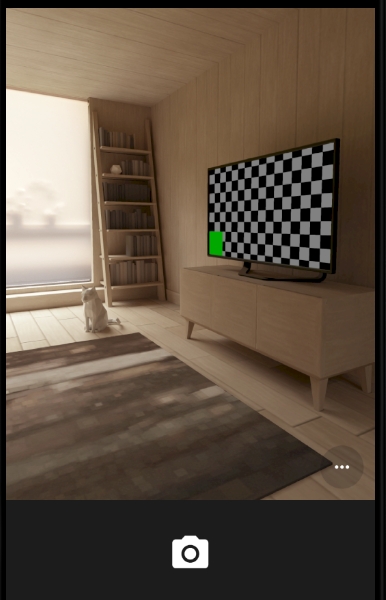
btnPhoto.setOnClickListener(new View.OnClickListener(){
public void onClick(View v){
Intent intent = new Intent(MediaStore.ACTION_IMAGE_CAPTURE); // 카메라 앱 실행
startActivity(intent);
}
});
}
}
|
cs |
③ 액티비티 생명주기
안드로이드 응용 프로그램은 동시에 여러 개의 액티비티(화면)가 나올 수 없습니다.
응용 프로그램이 여러 개의 액티비티로 작성되어 있다면 앞에 나오는 화면 하나만 활성화된 상태이고 나머지는 모두 비활성화된 상태가 됩니다.
액티비티의 생명주기는 생성부터 소멸까지의 주기를 말합니다.
1. 응용 프로그램이 시작되면 onCreate() -> onStart() -> onResume() 메소드가 차례로 실행되고 메인 액티비티가 화면에 나옵니다.
2-1. 메인 액티비티를 끝내면 onPause() -> onStop() -> onDestory() 메소드가 차례로 수행되고 응용 프로그램이 종료됩니다.
2-2-1. 다른 액티비티를 요청하면 onpause() -> onStop() 메소드가 수행되고 메인 액티비티가 중지되며 다른 액티비티 화면이 나옵니다.
2-2-2. 이 액티비티의 사용을 종료하면 onRestart() -> onStart() -> onResume() 메소드가 수행되고 다시 메인 엑티비티 화면이 나옵니다.
LogCat(로그캣)
작성 중인 프로그램에 예기치 못한 오류가 발생했을 때 원인을 파악하는 방법 중 하나가 로그(log)를 남기는 것입니다.
안드로이드는 android.util.Log 클래스를 제공하여 로그를 남기고, 로그캣(LogCat)이라는 화면을 제공합니다.
프로그래머가 로그를 남기기 위해 사용하는 메소드는 다음과 같습니다.
| 메소드 | 설명 |
| android.util.Log.d("태그", "메시지") | Debugging: 디버깅 용도로 남기는 로그 |
| android.util.Log.e("태그", "메시지") | Error: 가장 심각한 오류 발생 시 남기는 로그 |
| android:util.Log.i("태그", "메시지") | information: 정보를 남기기 위한 로그 |
| android.util.Log.v("태그", "메시지") | Verbose: 상세한 기록을 남기기 위한 로그 |
| android.util.Log.w("태그", "메시지") | Warning: 경고 수준을 남기기 위한 로그 |
다음은 로그캣을 이용해서 액티비티 생명주기를 확인할 수 있는 예제입니다.
activity_main.xml
|
1
2
3
4
5
6
7
8
9
10
11
12
13
14
15
16
17
|
<?xml version="1.0" encoding="utf-8"?>
<LinearLayout xmlns:android="http://schemas.android.com/apk/res/android"
xmlns:tools="http://schemas.android.com/tools"
android:layout_width="match_parent"
android:layout_height="match_parent"
android:orientation="vertical">
<Button
android:layout_width="wrap_content"
android:layout_height="wrap_content"
android:id="@+id/btnDial"
android:text="전화걸기" />
<Button
android:layout_width="wrap_content"
android:layout_height="wrap_content"
android:id="@+id/btnFinish"
android:text="끝내기" />
</LinearLayout>
|
cs |
MainActivity.java
|
1
2
3
4
5
6
7
8
9
10
11
12
13
14
15
16
17
18
19
20
21
22
23
24
25
26
27
28
29
30
31
32
33
34
35
36
37
38
39
40
41
42
43
44
45
46
47
48
49
50
51
52
53
54
55
56
57
58
59
60
61
62
63
64
65
|
import android.content.Intent;
import android.net.Uri;
import android.os.Bundle;
import android.view.View;
import android.widget.Button;
import androidx.appcompat.app.AppCompatActivity;
public class MainActivity extends AppCompatActivity {
@Override
protected void onCreate(Bundle savedInstanceState) {
super.onCreate(savedInstanceState);
setContentView(R.layout.activity_main);
setTitle("액티비티");
android.util.Log.i("액티비티 테스트", "onCreate");
Button btnDial = (Button) findViewById(R.id.btnDial);
btnDial.setOnClickListener(new View.OnClickListener(){
public void onClick(View v){
Uri uri = Uri.parse("tel:01012341234");
Intent intent = new Intent(Intent.ACTION_DIAL,uri);
startActivity(intent);
}
});
Button btnFinish = (Button) findViewById(R.id.btnFinish);
btnFinish.setOnClickListener(new View.OnClickListener() {
@Override
public void onClick(View view) {
finish();
}
});
}
@Override
protected void onDestroy(){
super.onDestroy();
android.util.Log.i("액티비티 테스트","onDestroy()");
}
protected void onPause(){
super.onPause();
android.util.Log.i("액티비티 테스트","onPause()");
}
protected void onRestart(){
super.onRestart();
android.util.Log.i("액티비티 테스트", "onRestart()");
}
protected void onResume(){
super.onResume();
android.util.Log.i("액티비티 테스트", "onResume()");
}
protected void onStart(){
super.onStart();
android.util.Log.i("액티비티 테스트", "onStart()");
}
protected void onStop(){
super.onStop();
android.util.Log.i("액티비티 테스트","onStop()");
}
}
|
cs |
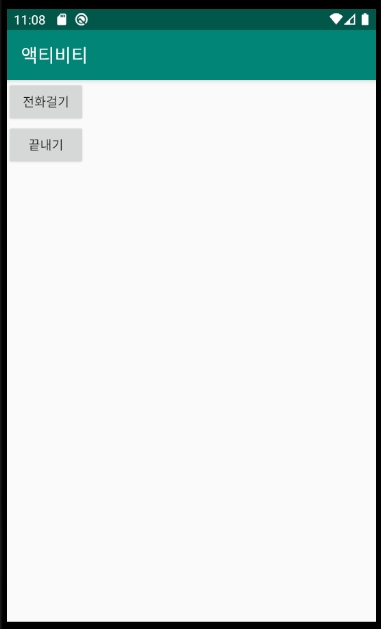
우선 안드로이드 결과는 다음과 같습니다.
액티비티 컴포넌트를 확인하기 위해서 로그캣을 설정해야 합니다.
우선 왼쪽 하단에 Logcat탭을 선택해준 후 [Edit Filter Configuration]을 클릭해서 필터 설정을 합니다.
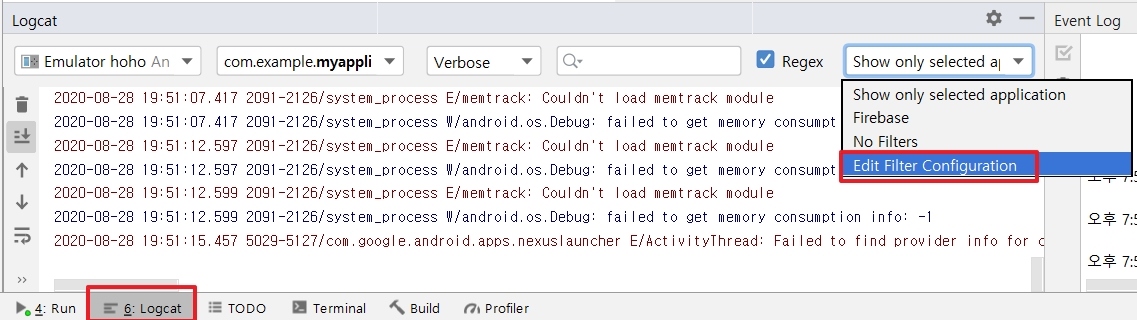
필터 설정은 출력할 로그를 걸러주는 역할을 합니다.
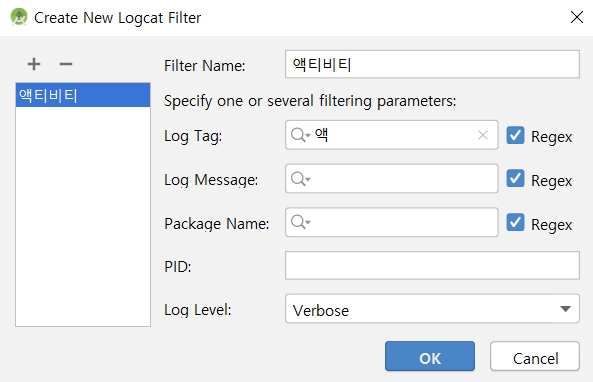
Filter Name은 마음대로 설정하고 Log Tag는 위의 코드에서 설정한 로그 태그인 '액티비티 테스트'글자 일부만을 넣으면 됩니다.
즉, '액' , '액티', '액티비', '액티비티', '액티비티 테', '액티비티 테스', '액티비티 테스트' 중에 넣으면 해당 로그 태그를 가진 로그들만 출력시킬 수 있습니다.
로그캣을 설정한 후 코드를 실행시키면 처음에는 다음과 같이 나옵니다.
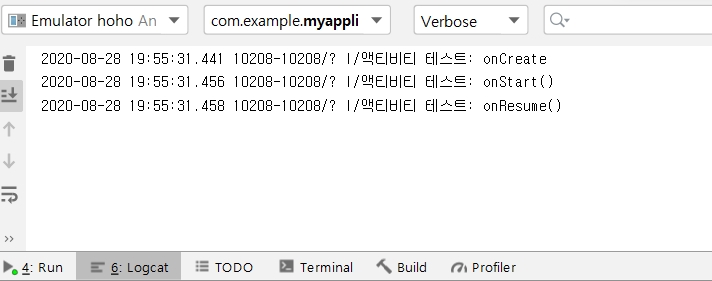
메인 액티비티가 실행되었으므로 다음과 같이 나옵니다.
다음은 '전화 걸기'버튼을 눌러서 다른 액티비티로 갔다가 다시 메인 액티비티로 돌아온 후 '끝내기' 버튼을 누를 때 나타나는 로그입니다.
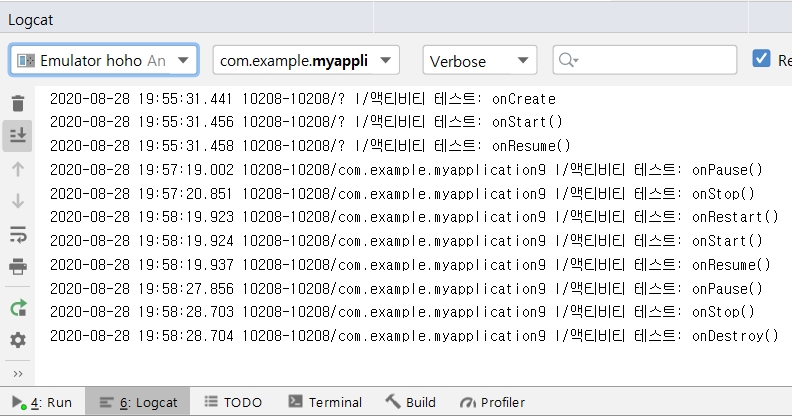
다른 액티비티로 갔을 때는 onPause() -> onStop() -> onRestart() 로그가 뜨고 그 후 '뒤로 버튼'으로 다시 메인 액티비티로 돌아가면 onStart() -> onResume() 이 실행됩니다.
마지막에 '끝내기' 버튼을 누르면 onPause() -> onStop() -> onDestroy()가 실행된 것을 확인할 수 있습니다.
'It공부 > 안드로이드' 카테고리의 다른 글
| 12. 데이터 관리 (0) | 2020.08.29 |
|---|---|
| 11. 어댑터뷰 (0) | 2020.08.27 |
| 9. 그래픽 (0) | 2020.08.25 |
| 8. 파일 처리 (0) | 2020.08.24 |
| 7.메뉴와 대화상자 (0) | 2020.08.23 |


