| 일 | 월 | 화 | 수 | 목 | 금 | 토 |
|---|---|---|---|---|---|---|
| 1 | 2 | 3 | 4 | 5 | 6 | 7 |
| 8 | 9 | 10 | 11 | 12 | 13 | 14 |
| 15 | 16 | 17 | 18 | 19 | 20 | 21 |
| 22 | 23 | 24 | 25 | 26 | 27 | 28 |
| 29 | 30 | 31 |
- deeplearning
- 밑바닥부터시작하는딥러닝2
- CBOW
- Crawling
- 크롤링
- 예제중심HTML&자바스크립트&CSS
- 생활코딩
- 한빛아카데미
- 셀레니움
- 딥러닝
- Lamp
- MySQL
- 비지도학습
- 소스설치
- AndroidStudio를활용한안드로이드프로그래밍
- Apache
- 컴파일설치
- 한빛미디어
- 논문리뷰
- 가비아
- 프로그램새내기를위한자바언어프로그래밍
- attention
- Selenium
- image
- word2vec
- aws
- 수동설치
- 밑바닥부터시작하는딥러닝
- jupyter
- 머신러닝
- Today
- Total
안녕, 세상!
5. 레이아웃 본문
(1) 레이아웃의 개요
① 레이아웃의 속성
안드로이드에서 사용하는 위젯은 레이아웃이라는 틀 위에 존재해야 합니다.
레이아웃은 ViewGroup 클래스로부터 상속받으며 내부에 무엇을 담는 용도로 쓰입니다.
레이아웃의 대표적인 속성은 다음과 같습니다.
orientation : 레이아웃 안에 배치할 위젯의 수직 또는 수평 방향을 설정함
gravity : 레이아웃 안에 배치할 위젯의 정렬 방향을 좌측, 우측, 중앙 등으로 설정함
padding : 레이아웃 안에 배치할 위젯의 여백을 설정함
layout_weight : 레이아웃이 전체 화면에서 차지하는 공간의 가중값을 결정함(여러 개 레이아웃이 중복될 경우 사용)
baselineAligned : 레이아웃 안에 배치할 위젯을 보기 좋게 정렬함
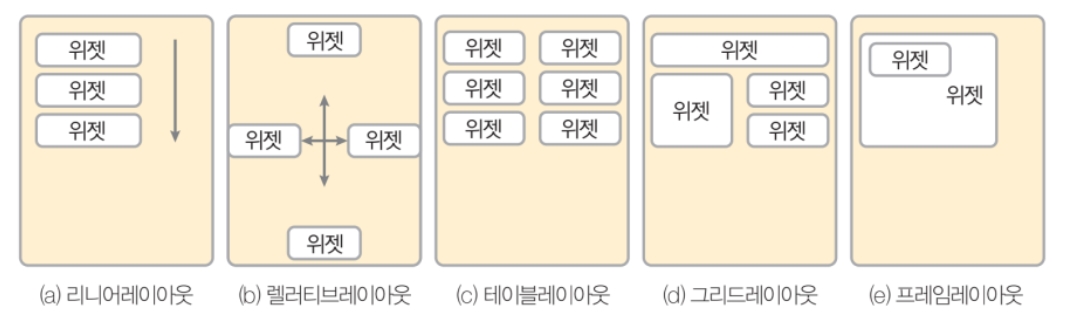
② 레이아웃의 종류
(a) LinearLayout
레이아웃의 왼쪽 위부터 아래쪽 도는 오른쪽으로 차례로 배치합니다.
(b) RelativeLayout
위젯 자신이 속한 레이아웃의 상하좌우 위치를 지정하여 배치하거나 다른 위젯으로부터 상대적인 위치를 지정해서 배치합니다.
(c) TableLayout
위젯을 행과 열의 개수를 지정한 테이블 형태로 배열합니다.
(d) GridLayout
테이블 레이아웃과 비슷하지만 행 또는 열을 확장하여 다양하게 배치할 때 편리합니다.
(e) FrameLayout
위젯을 왼쪽 위에 일률적으로 겹쳐서 배치하여 중복되어 보이는 효과를 낼 수 있습니다.
여러 개의 위젯을 배치한 후 상황에 따라서 필요한 위젯을 보이는 방식에 주로 활용됩니다.
(2) LinearLayout
① Orientation 속성
레이아웃 안에 포함될 위젯의 배치를 왼쪽 위부터 어떻게 쌓을지 결정합니다.
값은 다음과 같습니다.
vertical : 위젯을 수직 방향으로 쌓음
horizontal : 위젯을 수평 방향으로 쌓음
android:orientation="vertical"

android:orientation="horizontal"

② gravity & layout_gravity 속성
gravitiy 속성은 레이아웃 안의 위젯을 어디에 배치할 것인지 결정하는 값으로 left, right, center, top, bottom 등을 사용할 수 있습니다.
2개를 조합해서 left|center처럼 사용할 수도 있습니다.
gravity와 layout_gravity의 차이점
gravity : 자신(레이아웃)에게 포함된 자식(위젯)을 어디에 위치시킬지 결정 -> 레이아웃에 사용됨
layout_gravity : 자신(위젯)의 위치를 부모의(레이아웃) 어디쯤에 위치시킬지를 결정 -> 위젯에 사용됨
형식 예시
android:layout_gravity="left"
③ baselineAligned 속성
크기가 다른 위젯들을 보기 좋게 정렬해주는 것으로 true와 false값을 지정할 수 있습니다.
기본 default 값이 true여서 기본적으로 보기 좋게 정렬됩니다.
레이아웃에 false를 설정하면 baselineAligned가 해제된 모습을 확인할 수 있습니다.

(3) 중복 LinearLayout
화면에 수평과 수직으로 다양하게 배치하려면 중복 형태로 레이아웃을 배치해야 합니다.
형식은 다음과 같습니다.
<LinearLayout>
<LinearLayout>
.... 위젯
</LinearLayout>
<LinearLayout>
.... 위젯
</LinearLayout>
....
</LinearLayout>
① layout_weight 속성
LinearLayout을 여러 개 사용할 경우 각 레이아웃의 크기를 지정해야 합니다.
전체를 채워야 하기 때문에 dp, px 등의 단위보다 전체 화면에 대한 비율(%)로 지정합니다.
이때 layout_weight 속성을 사용합니다.
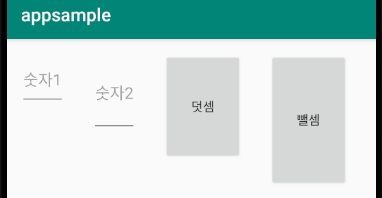
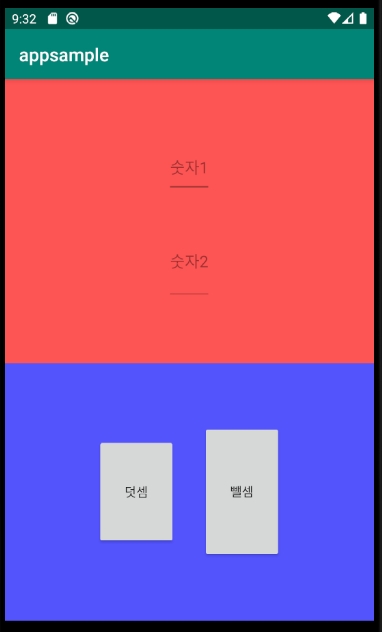
다음은 레이아웃의 큰 틀에 레이아웃들을 중복시켜서 위젯을 수직으로 배치한 레이아웃과 수평으로 배치한 레이아웃 예제입니다.
레이아웃을 시각적으로 확인할 수 있게 레이아웃에 색을 칠했습니다.
activity_main.xml
|
1
2
3
4
5
6
7
8
9
10
11
12
13
14
15
16
17
18
19
20
21
22
23
24
25
26
27
28
29
30
31
32
33
34
35
36
37
38
39
40
41
42
43
44
45
46
47
48
49
50
51
|
<?xml version="1.0" encoding="utf-8"?>
<LinearLayout xmlns:android="http://schemas.android.com/apk/res/android"
xmlns:tools="http://schemas.android.com/tools"
android:layout_width="match_parent"
android:layout_height="match_parent"
android:orientation="vertical" >
<LinearLayout
android:layout_width="match_parent"
android:layout_height="wrap_content"
android:orientation="vertical"
android:gravity="center"
android:background="#AAFF0000">
<EditText
android:layout_width="wrap_content"
android:layout_height="60dp"
android:layout_margin="15dp"
android:hint="숫자1"
android:id="@+id/edittext1"/>
<EditText
android:layout_width="wrap_content"
android:layout_height="90dp"
android:layout_margin="15dp"
android:hint="숫자2"
android:id="@+id/edittext2" />
</LinearLayout>
<LinearLayout
android:layout_width="match_parent"
android:layout_height="wrap_content"
android:orientation="horizontal"
android:gravity="center"
android:background="#AA0000FF">
<Button
android:layout_width="wrap_content"
android:layout_height="120dp"
android:layout_margin="15dp"
android:text="덧셈"
android:id="@+id/button1" />
<Button
android:layout_width="wrap_content"
android:layout_height="150dp"
android:layout_margin="15dp"
android:text="뺄셈"
android:id="@+id/button2" />
</LinearLayout>
</LinearLayout>
|
cs |

위의 코드의 중복된 레이아웃 부분에 android:weight="1"을 둘 다 넣어주면 2개의 레이아웃이 1:1 비율로 다음과 같이 출력됩니다.
비율을 서로 다르게 지정하고 싶으면 큰 LinearLayout 틀을 포함한 3개 LinearLayout틀 모두 layout_height를 0dp로 설정한 다음 원하는 비율을 layout_weight에 서로 다른 숫자를 넣어서 비율로 지정하면 됩니다.
(4) Java코드로만 화면 만들기
XML 파일을 아예 사용하지 않고 Java코드만으로 화면을 구성할 수 있습니다.
자주 사용하는 방법이 아니지만 화면을 직접 구성해야 할 때 적용할 수 있습니다.
다음은 java코드만 사용해서 레이아웃을 구축하고 버튼 위젯을 넣고 버튼을 클릭 시 메시지가 잠깐 뜨는 예제입니다.
우선 activity_main.xml은 사용하지 않을 것이므로 삭제를 한 후 java코드의 setContentView부분이 오류가 생기므로 해당 줄을 주석처리시킵니다.
MainActivity.java
|
1
2
3
4
5
6
7
8
9
10
11
12
13
14
15
16
17
18
19
20
21
22
23
24
25
26
27
28
29
30
31
32
33
34
35
36
|
import android.graphics.Color;
import android.os.Bundle;
import android.view.View;
import android.widget.Button;
import android.widget.LinearLayout;
import android.widget.Toast;
import androidx.appcompat.app.AppCompatActivity;
public class MainActivity extends AppCompatActivity {
@Override
protected void onCreate(Bundle savedInstanceState) { //main 함수라 생각하면됨
super.onCreate(savedInstanceState);
//setContentView(R.layout.activity_main);
LinearLayout.LayoutParams params = new LinearLayout.LayoutParams(
LinearLayout.LayoutParams.MATCH_PARENT,
LinearLayout.LayoutParams.MATCH_PARENT);
LinearLayout lnsample = new LinearLayout(this);
lnsample.setOrientation(LinearLayout.VERTICAL);
lnsample.setBackgroundColor(Color.rgb(0,0,255));
setContentView(lnsample, params);
Button btn = new Button(this);
btn.setText("버튼");
btn.setBackgroundColor(Color.RED);
lnsample.addView(btn);
btn.setOnClickListener(new View.OnClickListener(){
public void onClick(View v){
Toast.makeText(getApplicationContext(),"버튼을 눌렀습니다.", Toast.LENGTH_SHORT).show();
}
});
}
}
|
cs |

java를 아시면 위의 코드를 XML과 비교해서 충분히 이해할 수 있습니다.
java코드의 첫줄의 Package구문은 앞으로 생략하겠습니다.
(5) 기타 레이아웃
① RelativeLayout
상대 레이아웃으로 레이아웃 내부에 포함된 위젯을 상대적인 위치로 배치합니다.
RelativeLayout안에 포함된 위젯의 속성 중 위젯을 상대 레이아웃의 어느 위치에 배치할지를 결정하는 속성은 다음과 일곱 가지입니다.

위젯을 위의 주황색점을 위치로 표현하면 다음과 같습니다.
android:layout_alignParentRight="true"
android:layout_alignParentTop="true"
위와 같이 위젯을 상대 레이아웃의 특정 위치에 놓을 수 있는 기능 외에 상대 레이아웃 안에 있는 기준 위젯의 특정한 곳에 배치하는 방법도 있습니다.

상대 레이아웃에서는 하나의 위젯에 대한 상대적인 위치만 적용할 수 있는 것이 아니라 여러 기준 위젯에 대한 상대적인 위치를 나타낼 수 있습니다.
다음은 두 개의 기준 위젯을 기준으로 한 위젯들을 나타난 예제입니다.
activity_main.xml
|
1
2
3
4
5
6
7
8
9
10
11
12
13
14
15
16
17
18
19
20
21
22
23
24
25
26
27
28
29
30
31
32
33
34
35
36
37
|
<?xml version="1.0" encoding="utf-8"?>
<RelativeLayout xmlns:android="http://schemas.android.com/apk/res/android"
xmlns:tools="http://schemas.android.com/tools"
android:layout_width="match_parent"
android:layout_height="match_parent"
android:orientation="vertical">
<Button
android:layout_width="wrap_content"
android:layout_height="wrap_content"
android:id="@+id/standbt1"
android:layout_alignParentLeft="true"
android:layout_alignParentTop="true"
android:text="기준1"/>
<Button
android:layout_width="wrap_content"
android:layout_height="wrap_content"
android:id="@+id/standbt2"
android:layout_alignParentRight="true"
android:layout_centerVertical="true"
android:text="기준2" />
<Button
android:layout_width="wrap_content"
android:layout_height="wrap_content"
android:layout_above="@+id/standbt2"
android:layout_toRightOf="@+id/standbt1"
android:text="1" />
<Button
android:layout_width="wrap_content"
android:layout_height="wrap_content"
android:layout_alignParentRight="true"
android:layout_below="@+id/standbt1"
android:text="2" />
</RelativeLayout>
|
cs |

② TableLayout
TableLayout은 위젯을 표 형태로 배치할 때 사용합니다.
TableLayout과 함께 사용되는 <TableRow>는 한 행을 표현합니다.
<TableRow>의 위젯 수로 행의 개수가 결정됩니다.
다음은 TableLayout의 형식입니다.
<TableLayout xmln:android="...">
<TableRow>
위젯....
</TableRow>
<TableRow>
위젯....
</TableRow>
....
</TableLayout>
TableLayout 속성
layout_span="숫자값" : 현재 셀(열 기준)로 부터 숫자 값만큼의 셀을 합쳐서 표시해줌 (위젯에 설정)
열로는 합칠 수 있지만 행으론 합칠 수 없음
layout_column="숫자값" : 지정된 숫자 값의 열에 현재 위젯을 표시하라는 의미 (위젯에 설정)
stretchColumns="숫자값, 숫자값, .." : 지정된 열의 폭을 늘리는 속성, 숫자 값은 늘리려는 열의 번호
(테이블 레이아웃)
열의 번호는 "0"부터 시작합니다.
layout_span과 layout_column을 사용할 때 조건이 있습니다.
layout_span으로 합친 셀(위젯) 아래나 위에는 반드시 셀을 채워줘야 합니다.
그렇지 않으면 원하는 대로 코드가 실행되지 않습니다.
그림으로 표현하자면 다음과 같이 코드를 짠 상태로 실행하면 다음과 같이 배치가 되지 않습니다.
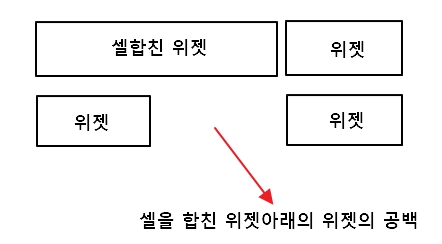
오직 셀 합친 위젯 아래에 위젯을 채워준 상태만 만들 수 있습니다.
다음은 layout_span과 layout_colum을 사용한 예제입니다.
|
1
2
3
4
5
6
7
8
9
10
11
12
13
14
15
16
17
18
19
20
21
22
23
24
25
26
27
28
29
30
31
32
33
34
35
36
37
38
39
40
41
42
43
|
<?xml version="1.0" encoding="utf-8"?>
<TableLayout xmlns:android="http://schemas.android.com/apk/res/android"
xmlns:tools="http://schemas.android.com/tools"
android:layout_width="match_parent"
android:layout_height="match_parent"
android:orientation="vertical">
<TableRow>
<Button
android:layout_width="wrap_content"
android:layout_height="wrap_content"
android:layout_span="2"
android:text="1"/>
<Button
android:layout_width="wrap_content"
android:layout_height="wrap_content"
android:text="2"/>
<Button
android:layout_width="wrap_content"
android:layout_height="wrap_content"
android:text="3"/>
</TableRow>
<TableRow>
<Button
android:layout_width="wrap_content"
android:layout_height="wrap_content"
android:text="4"/>
<Button
android:layout_width="wrap_content"
android:layout_height="wrap_content"
android:text="5"/>
<Button
android:layout_width="wrap_content"
android:layout_height="wrap_content"
android:layout_column="3"
android:text="6"/>
</TableRow>
</TableLayout>
|
cs |

③ GridLayout
그리드 레이아웃은 테이블 레이아웃과 마찬가지로 위젯을 표 형태로 배치할 때 사용합니다.
테이블 레이아웃보다 직관적으로 설정할 수 있습니다.
속성은 다음과 같습니다.
rowCount : 행의 수
columnCount : 열의 수
orientation : 그리드를 수평 방향으로 우선할 것인지, 수직 방향으로 우선할 것인지를 결정
layout_row : 위젯이 위치할 행 번호(0부터 시작)
layout_column : 위젯이 위치할 열 번호(0부터 시작)
layout_rowSpan : 행을 지정된 수만큼 확장함
layout_columnSpan : 열을 지정된 수만큼 확장함
layout_gravity : layout_rowSpan이나 layout_columnSpan으로 행 또는 열이 확장되었을 때 위젯을 위젯을 확장된 셀에 꽉 채우는 효과를 나타냅니다.
값은 fill, fill_vertical, fill_horizontal 등이 있습니다.
다음은 GridLayout을 활용한 예제입니다.
activity_main.xml
|
1
2
3
4
5
6
7
8
9
10
11
12
13
14
15
16
17
18
19
20
21
22
23
24
25
26
27
28
29
30
31
32
33
34
35
36
37
38
39
40
|
<?xml version="1.0" encoding="utf-8"?>
<GridLayout xmlns:android="http://schemas.android.com/apk/res/android"
xmlns:tools="http://schemas.android.com/tools"
android:layout_width="wrap_content"
android:layout_height="wrap_content"
android:columnCount="3"
android:rowCount="2">
<Button
android:layout_width="wrap_content"
android:layout_height="wrap_content"
android:layout_column="0"
android:layout_row="0"
android:layout_columnSpan="2"
android:layout_gravity="fill_horizontal"
android:text="1"/>
<Button
android:layout_width="wrap_content"
android:layout_height="wrap_content"
android:layout_column="2"
android:layout_row="0"
android:layout_rowSpan="2"
android:layout_gravity="fill_vertical"
android:text="2"/>
<Button
android:layout_width="wrap_content"
android:layout_height="wrap_content"
android:layout_column="0"
android:layout_row="1"
android:text="3"/>
<Button
android:layout_width="wrap_content"
android:layout_height="wrap_content"
android:layout_column="1"
android:layout_row="1"
android:text="4"/>
</GridLayout>
|
cs |
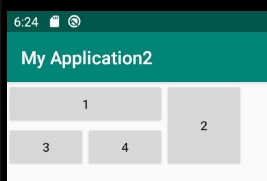
결과가 잘 나오게 하려면 4, 5번째 줄의 layout_width와 height을 모두 wrap_content로 설정해야 합니다.
4, 5번째 줄의 layout_width와 height이 해당 레이아웃 안의 위젯들에게 영향을 주는 값이기 때문입니다.
④ FrameLayout
FrameLayout은 단순히 레이아웃 내의 위젯을 왼쪽 상단부터 겹쳐서 출력해줍니다.

FrameLayout의 속성은 다음과 같습니다.
foreground : 프레임 레이아웃의 전경 이미지를 지정함
foregroundGravity : 전경 이미지의 위치를 지정함. fill, right, left, top, bottom 등의 값을 사용
'It공부 > 안드로이드' 카테고리의 다른 글
| 7.메뉴와 대화상자 (0) | 2020.08.23 |
|---|---|
| 6. 고급 위젯 (0) | 2020.08.22 |
| 4. 기본 위젯 (0) | 2020.08.20 |
| 3. Java 문법 (0) | 2020.08.17 |
| 2. 안드로이드 애플리케이션 기초 (0) | 2020.08.16 |


