
| 일 | 월 | 화 | 수 | 목 | 금 | 토 |
|---|---|---|---|---|---|---|
| 1 | 2 | 3 | 4 | 5 | ||
| 6 | 7 | 8 | 9 | 10 | 11 | 12 |
| 13 | 14 | 15 | 16 | 17 | 18 | 19 |
| 20 | 21 | 22 | 23 | 24 | 25 | 26 |
| 27 | 28 | 29 | 30 |
- 딥러닝
- 논문리뷰
- 크롤링
- 한빛아카데미
- deeplearning
- 밑바닥부터시작하는딥러닝
- 컴파일설치
- Crawling
- attention
- 수동설치
- 밑바닥부터시작하는딥러닝2
- Lamp
- 머신러닝
- Selenium
- 소스설치
- AndroidStudio를활용한안드로이드프로그래밍
- 예제중심HTML&자바스크립트&CSS
- jupyter
- image
- Apache
- aws
- 가비아
- word2vec
- 비지도학습
- 프로그램새내기를위한자바언어프로그래밍
- 생활코딩
- CBOW
- 한빛미디어
- MySQL
- 셀레니움
- Today
- Total
안녕, 세상!
4. 기본 위젯 본문
(1) 뷰(View)
① View의 개요
앱을 실행하면 화면이 나타나는데 화면을 구성하고 있는 요소들을 뷰(View)라고 합니다.
텍스트뷰, 버튼, 라이도버튼, 이미지 등이 모두 뷰에 속합니다.
View 클래스는 '위젯'이라고도 하며 안드로이드 화면에서 실제로 사용되는 것(버튼, 이미지 등)들은 View 클래스의 상속을 받습니다.
다른 위젯을 담을 수 있는 위젯을 레이아웃이라고 하며 레이아웃은 ViewGroup이라는 클래스 아래에 존재합니다.
위젯은 단독으로 존재할 수 없으며, 레이아웃이라는 틀에 담아서 배치가 됩니다.
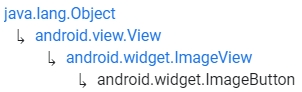
다음은 View 클래스 계층도입니다.
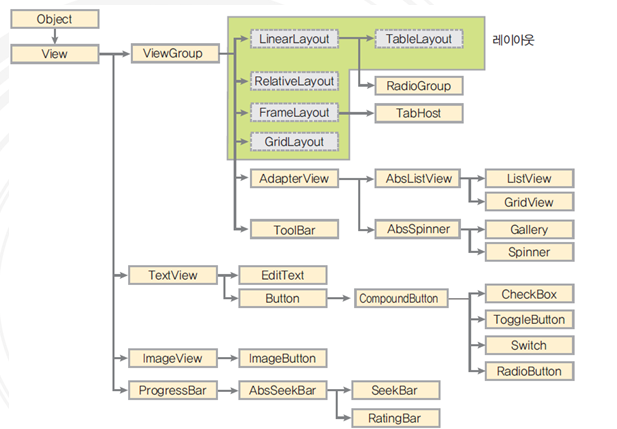
ListView, GridView, Gallery 등은 레이아웃이라고 부르지 않지만 다른 뷰를 포함하는 View Container라고 합니다.
가장 자주 사용하는 위젯인 버튼의 속성에 대해서 설명하겠습니다.
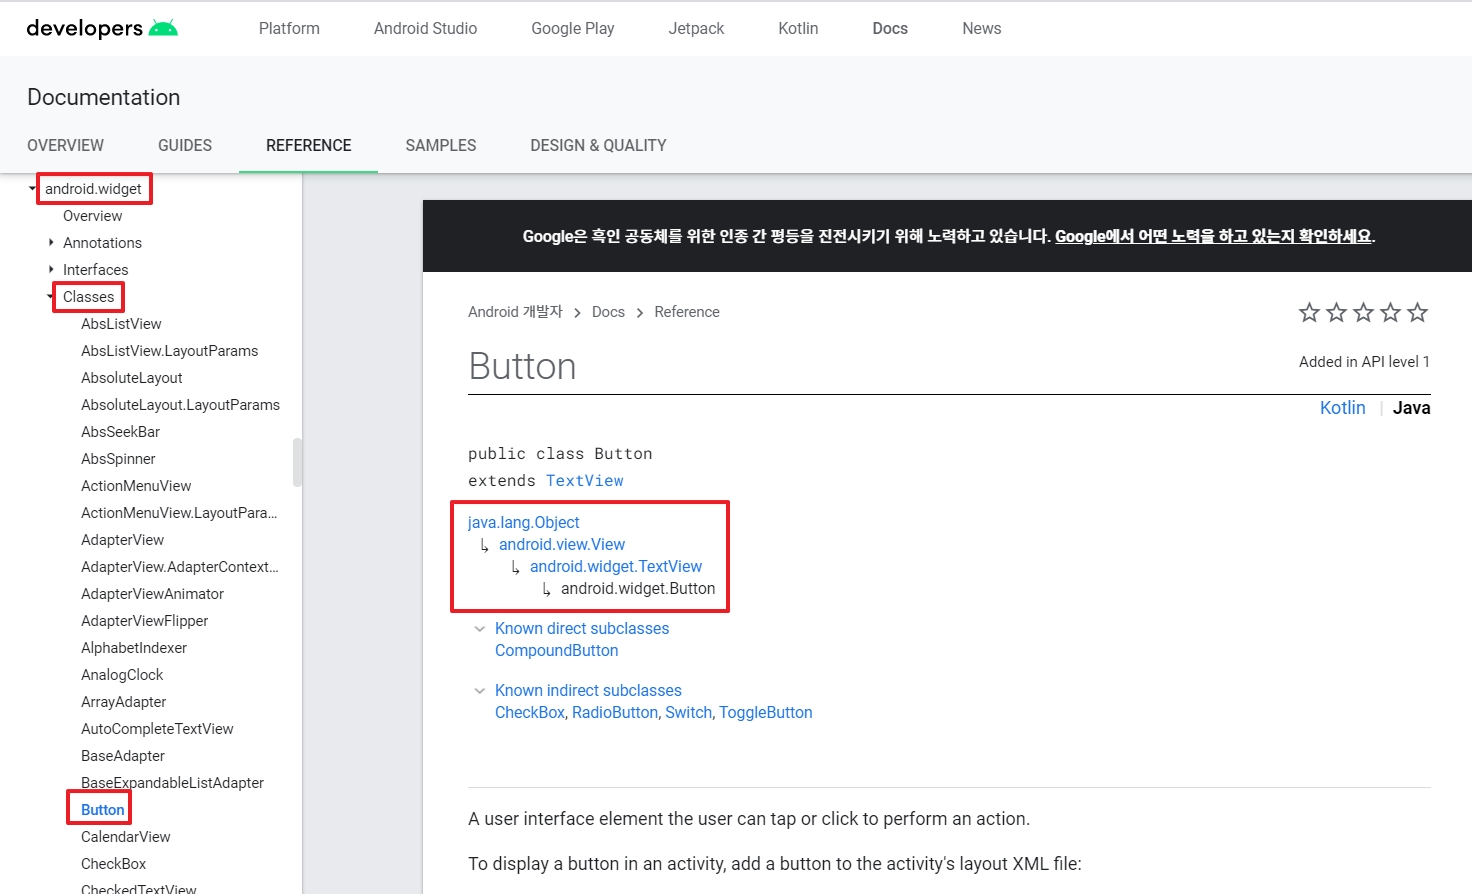
Android Studio에서 XML 파일의 <Button>안의 android: 를 입력하면 버튼의 XML 속성 목록을 확인할 수 있습니다.
Button에는 XML 속성이 거의 없고 대개 상위 클래스인 TextView나 View에서 상속받습니다.
이러한 클래스의 상속관계는 다음 주소에서 확인할 수 있습니다.
https://developer.android.com/reference/android/widget/Button
Button | Android 개발자 | Android Developers
developer.android.com
② View 클래스의 XML 속성
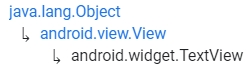
View 클래스는 모든 위젯의 부모 클래스입니다.
View 클래스의 중요한 속성을 파악하면 하위 클래스도 쉽게 이해할 수 있습니다.
(1) id 속성
모든 위젯의 아이디를 나타내며 Java코드에서 위젯에 접근할 때 속성에 지정한 아이디를 사용합니다.
형식은 다음과 같습니다.
android:id = @+id/위젯id // xml코드 선언 형식
위젯변수 = (위젯형) findViewById(R.id.위젯id); // java에서 객체 적용 형식
보통 클릭이나 터치를 했을 때 어떤 동작을 하기 위한 것으로 id를 지정해줍니다.
클릭이나 터치를 해도 아무 동작이 필요 없는 글자나 배경이미지는 굳이 id속성을 지정하지 않아도 됩니다.
(2) layout_width, layout_height 속성
모든 위젯에 필수로 들어가는 속성으로, 위젯의 폭과 높이를 설정할 수 있는 속성입니다.속성의 값을 직접 px 단위로 설정을 하거나 match_parent와 wrap_content 값으로 설정할 수 있습니다.match_parent : 레이아웃에 꽉차게 폭이나 높이를 맞춤wrap_content : 위젯의 폭이나 높이를 위젯안의 글자가 꼭 들어갈 정도로만 맞춤형식은 다음과 같습니다.
android:layout_width=" "; // xml 코드
android:layout_height=" "; // " "사이에 px수치단위 혹은 match_parent, wrap_content
2장에서 만든 버튼의 형식을 보면 다음과 같습니다.
이 버튼은 layout_width=match_parent 이고 layout_height=wrap_content 로 되어 있습니다.
위젯의 크기를 dp, sp, px 등의 단위로 설정할 수 있습니다.dp(Destiny-independent Pixel)는 화면 밀도에 독립적으로 사용되는 단위라서 스마트폰 해상도와 관계없이 화면에 비슷한 비율로 표현할 수 있습니다.폰트를 지정할 때는 sp(Scaled Pixel) 단위를 많이 사용합니다.
(3) background 속성
background속성은 위젯의 색상을 주로 #RRGGBB값으로 지정합니다. (16진수로 설정)
형식은 다음과 같습니다.
android:background="#ff0000" // 빨강색으로 설정
색상의 투명도를 설정하기위해서 #AARRGGBB 방식으로 사용할 수 도 있습니다.
AA는 00~FF로 지정할 수 있는데 00은 완전투명 FF는 완전 불투명을 나타냅니다.
(4) padding 속성
padding 속성을 사용해서 위젯의 경계선으로부터 위젯 안의 요소가 떨어지도록 설정할 수 있습니다.
즉, 레이아웃의 경계와 위젯 사이에 여백을 둘 수 있습니다.
형식은 다음과 같습니다.
android:padding="20dp"
(5) layout_margin 속성
layout_margin 속성을 사용하게되면 위젯과 위젯 사이에 여유를 둘 수 있습니다.
layout_margin 속성은 상하좌우 모두에 지정되는 속성입니다.
따로 지정하고 싶으면 layout_marginTop, layout_marginBottom, layout_marginLeft, layout_marginRight를 이용합니다.
android:layout_margin="20dp"
(6) visibility 속성
위젯을 보일 것인지 보이지 않을 것인지 여부를 결정하는 속성입니다.
값은 세가지로 visibile, invisible, gone 값을 설정할 수 있습니다.
visible : 보이는 상태
invisible : 보이지 않지만 원래의 자리를 유지함
gone : 보이지 않고 자리도 사라짐
형식은 다음과 같습니다.
android:visibility="invinsible"
(7) enabled, clickable 속성
enabled 속성은 위젯의 동작여부를 결정하는 속성이며 값은 true/false로 정할 수 있습니다.
clickable 속성은 클릭이나 터치를 가능여부를 결정하는 속성이며 값은 true/false로 정할 수 있습니다.
둘다 default 값은 true입니다.
형식은 다음과 같습니다.
android:enabled="true"
android:clickable="true"
(8) rotation 속성
roatation 속성은 위젯을 회전시켜서 출력하며 값은 각도로 정합니다.
형식은 다음과 같습니다.
android:rotation="45"
(2) 기본 위젯
① 텍스트 뷰(Text View)
Text View의 하위에는 다양한 위젯이 존재합니다. (버튼, 체크박스 등)
Text View의 주요 속성을 알면 하위의 위젯에서도 다양하게 쓰일 수 있습니다.
XML의 형식은 위에서도 보았듯이 android:속성명 = "속성값" 형식으로 쓰입니다.
(1) text 속성
텍스트뷰에 나타나는 문자열을 표현합니다.
(2) textColor 속성
글자의 색상을 지정하며, background 속성처럼 값은 #RRGGBB 혹은 #AARRGGBB형식입니다.
(3) textSize 속성
글자의 크기를 dp, px, in, mm, sp 단위로 지정함
(4) typeface 속성
글자의 글꼴을 지정합니다.
값으로 serif, sans, monospace 등을 설정할 수 있고 default는 normal입니다.
(5) textStyle 속성
글자의 스타일을 지정합니다.
값으로 bold, italic, bold|italic 을 설정할 수 있고 default값은 normal입니다.
(6) singleLine 속성
글이 길어 줄이 넘어갈 경우 강제로 한 줄까지만 출력하고 문자열의 맨 뒤에 '...'를 표시합니다.
값은 true/false로 나타낼 수 있고 default값은 false입니다.
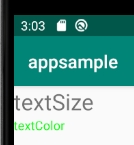
activity_main.xml코드
|
1
2
3
4
5
6
7
8
9
10
11
12
13
14
15
16
17
18
19
20
21
22
23
24
|
<?xml version="1.0" encoding="utf-8"?>
<LinearLayout xmlns:android="http://schemas.android.com/apk/res/android"
xmlns:tools="http://schemas.android.com/tools"
android:layout_width="match_parent"
android:layout_height="match_parent"
android:orientation="vertical">
<TextView
android:layout_width="wrap_content"
android:layout_height="wrap_content"
android:textSize="25dp"
android:text="textSize" />
<TextView
android:layout_width="wrap_content"
android:layout_height="wrap_content"
android:textColor="#00FF00"
android:text="textColor" />
</LinearLayout>
|
cs |
위에서는 XML속성으로 이용해서 위젯을 설정했는데 java코드로 XML 속성 설정을 할 수 있습니다.
activity_main.xml
|
1
2
3
4
5
6
7
8
9
10
11
12
13
14
15
16
17
18
|
<?xml version="1.0" encoding="utf-8"?>
<LinearLayout xmlns:android="http://schemas.android.com/apk/res/android"
xmlns:tools="http://schemas.android.com/tools"
android:layout_width="match_parent"
android:layout_height="match_parent"
android:orientation="vertical">
<TextView
android:layout_width="wrap_content"
android:layout_height="wrap_content"
android:text="textSize"
android:id="@+id/textView1" />
<TextView
android:layout_width="wrap_content"
android:layout_height="wrap_content"
android:text="textColor"
android:id="@+id/textView2" />
</LinearLayout>
|
cs |
MainAcitivity.java
|
1
2
3
4
5
6
7
8
9
10
11
12
13
14
15
16
17
18
19
20
21
22
23
|
package com.example.appsample; // 패키지 이름
import android.graphics.Color;
import android.os.Bundle;
import android.widget.TextView;
import androidx.appcompat.app.AppCompatActivity;
public class MainActivity extends AppCompatActivity {
@Override
protected void onCreate(Bundle savedInstanceState) { //main 함수라 생각하면됨
super.onCreate(savedInstanceState);
setContentView(R.layout.activity_main);
TextView tv1, tv2;
tv1= (TextView) findViewById(R.id.textView1);
tv2= (TextView) findViewById(R.id.textView2);
tv1.setText("안녕하세요");
tv1.setTextSize(40);
tv2.setTextColor(Color.GREEN);
tv2.setTextSize(30);
}
}
|
cs |
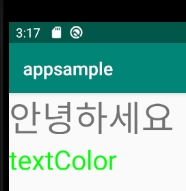
java코드에서 setText(), setTextColor 등의 메소드로 XML의 속성을 사용할 수 있습니다.
XML파일에서 설정하는 내용의 대부분이 메소드로 제공되어 java코드에서도 XML의 설정이 가능함을 확인할 수 있습니다.
| XML속성 | 관련 java 메소드 | 비고 |
| background | setBackgroundColor() | View 클래스 |
| clickable | setClickable() | View 클래스 |
| focusable | setFocusable() | View 클래스 |
| id | setId() | View 클래스 |
| longClickable | setLongClickable() | View 클래스 |
| padding | setPadding() | View 클래스 |
| rotation | setRotation() | View 클래스 |
| scaleX, scaleY | setScaleX(), setScaleY() | View 클래스 |
| visibility | setVisibility() | View 클래스 |
| gravity | setGravity() | TextView 클래스 |
| inputType | setRawInputType() | TextView 클래스 |
| password | setTransformationMethod() | TextView 클래스 |
| text | setText() | TextView 클래스 |
| textColor | setTextColor() | TextView 클래스 |
| textSize | setTextSize() | TextView 클래스 |
② 에디트텍스트(EditText)
EditText는 값을 입력받은 후 해당 값을 java코드에서 가져와 사용하는 용도로 쓰입니다.
XML코드 형식은 다음과 같습니다.
<EditText
android:id="@+id/edittextid" />
java코드 선언 형식은 다음과 같습니다.
EditText ETsample; // 에디트텍스트 변수 선언
ETsample = (EditText) findViewById(R.id.editextid); // 변수에 에디트텍스트 위젯대입
String mystr = ETsample.getText().toString(); // 에디트택스트에 입력된 값 가져오기
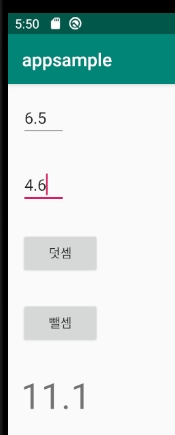
간단하게 덧셈/뺄셈 기능이 있는 계산기를 만들면 다음과 같습니다.
activity_main.xml
|
1
2
3
4
5
6
7
8
9
10
11
12
13
14
15
16
17
18
19
20
21
22
23
24
25
26
27
28
29
30
31
32
33
34
35
36
37
38
39
40
41
42
|
<?xml version="1.0" encoding="utf-8"?>
<LinearLayout xmlns:android="http://schemas.android.com/apk/res/android"
xmlns:tools="http://schemas.android.com/tools"
android:layout_width="match_parent"
android:layout_height="match_parent"
android:orientation="vertical">
<EditText
android:layout_width="wrap_content"
android:layout_height="wrap_content"
android:layout_margin="15dp"
android:hint="숫자1"
android:id="@+id/edittext1"/>
<EditText
android:layout_width="wrap_content"
android:layout_height="wrap_content"
android:layout_margin="15dp"
android:hint="숫자2"
android:id="@+id/edittext2" />
<Button
android:layout_width="wrap_content"
android:layout_height="wrap_content"
android:layout_margin="15dp"
android:text="덧셈"
android:id="@+id/button1" />
<Button
android:layout_width="wrap_content"
android:layout_height="wrap_content"
android:layout_margin="15dp"
android:text="뺄셈"
android:id="@+id/button2" />
<TextView
android:layout_width="wrap_content"
android:layout_height="wrap_content"
android:layout_margin="15dp"
android:textSize="40dp"
android:id="@+id/result" />
</LinearLayout>
|
cs |
MainAcitivity.java
|
1
2
3
4
5
6
7
8
9
10
11
12
13
14
15
16
17
18
19
20
21
22
23
24
25
26
27
28
29
30
31
32
33
34
35
36
37
38
39
40
41
42
43
44
45
46
47
|
package com.example.appsample; // 패키지 이름
import android.os.Bundle;
import android.view.View;
import android.widget.Button;
import android.widget.EditText;
import android.widget.TextView;
import androidx.appcompat.app.AppCompatActivity;
public class MainActivity extends AppCompatActivity {
EditText num1, num2;
Button addbt, subbt;
TextView tvresult;
String strval1, strval2;
float result;
@Override
protected void onCreate(Bundle savedInstanceState) { //main 함수라 생각하면됨
super.onCreate(savedInstanceState);
setContentView(R.layout.activity_main);
num1 = (EditText) findViewById(R.id.edittext1);
num2 = (EditText) findViewById(R.id.edittext2);
addbt = (Button) findViewById(R.id.button1);
subbt = (Button) findViewById(R.id.button2);
tvresult = (TextView) findViewById(R.id.result);
addbt.setOnClickListener(new View.OnClickListener(){
public void onClick(View v){
strval1= num1.getText().toString();
strval2= num2.getText().toString();
result=Float.valueOf(strval1)+Float.valueOf(strval2);
tvresult.setText(Float.toString(result));
}
});
subbt.setOnClickListener(new View.OnClickListener(){
public void onClick(View v){
strval1= num1.getText().toString();
strval2= num2.getText().toString();
result=Float.valueOf(strval1)-Float.valueOf(strval2);
tvresult.setText(Float.toString(result));
}
});
}
}
|
cs |
③ 컴파운드 버튼(CompoundButton)
CompoundButton은 Button클래스의 하위 클래스며 체크박스, 라디오버튼, 스위치, 토글버튼의 상위 클래스입니다.
(1) CheckBox
클릭을 해서 체크를 할 수 있으며 상자들이 서로 독립적으로 동작하므로 여러 개를 동시에 체크할 수 있습니다.
다음은 XML의 형식입니다.
<CheckBox
....
android:checked="true" /> // 체크여부 (true/false)
다음은 java코드에서 사용 형식입니다.
CheckBox cbsample; // 체크박스 변수 선언
cbsample = (CheckBox) findViewById(R.id.checkboxid); // 변수에 체크박스 대입
cbsample.setOnCheckedChangeListener(new CompoundButton.OnCheckedChangeListener() {
public void onCheckedChanged(CompoundButton buttonView, boolean isChecked) {
.... // 동작할 내용 코딩 부분
if(cbsample.isChecked() == true){
....
}
....
}
});
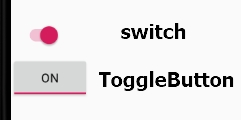
(2) Switch & ToggleButton
스위치와 토글버튼은 모양만 살짝 다를 뿐 용도는 on/off 상태 표시를 하는 용도로 같습니다.
XML의 형식
<Switch
....
android:checked="true" />
<ToggleButton
....
android:checked="true" />
(3) RadioButton & RadioGroup
RadioButton은 체크박스와 거의 동일하지만 여러 개 중 하나만 선택해야 하는 경우에 사용합니다.
RadioGroup은 RadioButton을 묶어주는 역할을 하며 Radio버튼이 제 역할을 하려면 RadioGroup에 묶여야 합니다.
<RadioGroup
....
<RadioButton
android.text="..." />
<RadioButton
android.text="...." />
....
</RadioGroup>
④ ImageView & ImageButton
ImageView는 그림을 출력하는 위젯으로 그림을 넣거나 화면을 꾸밀 때 사용합니다.
ImageView에 보여줄 그림파일은 프로젝트의 [res] -> [drawable]에 있어야 합니다.
ImageView 클래스는 View 클래스에서 바로 상속 받아서 앞서 배운 TextView의 하위 위젯들과 속성이 다릅니다.
ImageButton은 그림으로 표현된 화려한 버튼을 만들 때 사용하 수 있습니다.
ImageView와 ImageButton의 속성은 다음과 같습니다.
android:src="이미지경로" : 이미지경로에 있는 이미지 불러옴
android:scaleType="속성" : 지정한 값에 따라 이미지를 확대/축소하는 방식이 결정됨
(martrix, fitXY, fitStart, fitEnd, center, centerCrop, centerInside 등 속성이 있음)
이미지를 사용하려면 먼저 그림파일을 project tree의 [res] -> [drawable] 폴더에 복사해 놓아야 합니다.
'It공부 > 안드로이드' 카테고리의 다른 글
| 6. 고급 위젯 (0) | 2020.08.22 |
|---|---|
| 5. 레이아웃 (0) | 2020.08.21 |
| 3. Java 문법 (0) | 2020.08.17 |
| 2. 안드로이드 애플리케이션 기초 (0) | 2020.08.16 |
| 1. 안드로이드의 개요와 개발 환경 설치 (0) | 2020.08.14 |


